(Originally posted in 2013, I've reposted this tutorial for those who have asked about it)

A Midcentury Hairpin Legs DIY Tutorial
There are many online vendors of midcentury style hairpin legs. I've even bought a few myself over the years. As a furniture maker, i figured it was something i should dive into as i didn't like the quotes i was getting for wholesale from third parties. I had intended to sell them myself but honestly, its just not worth the labor involved so I've decided to post how to make them here on the Moderncre8ve blog. So dive in just like I did…. But expect some frustration and speed bumps along the way. Luckily I'm here to save you the trouble with this DIY tutorial!
The main glaring problem i noticed when i took on this project was that there were tons of websites about how to attach and where to buy hairpin legs, but ZERO websites, blogs, websites or videos about how to build and weld your own hairpin legs from scratch or any DIY tutorial thereof. GODAMMIT! Time to do figure out how to make them yourself, but luckily Ill take you through the build process and outline all the tools you need to make your own (with links) and photos.
Here we go!
You will need the following:
- -A Mig (or Tig) welder. I like the Hobart handler 140: There are cheaper and better welders but this one is great for beginner welders and simple welding projects and will last a very long time. Ebay and Craiglist are great options as well. Hobart, Miller and Lincoln Electric are great brands.
- -Welding Gloves, An Auto Darkening helmet, a leather apron. Gloves and helmet are mandatory. An apron is highly recommended as well! Please read up on welding safety tips here
- -A tank of C25 shielding gas. Even though its a hassle to buy a tank of shielding gas (I got mine from Airgas) you don't want to bother welding with fluxcore wire (tried it don't bother!). Its messy spluttery and IMO only useful for farm repairs and things of the like. If you buy the Handler 140 it comes with a regulator to attach to the tank.
- -A spool of .030 solid core wire (and .30 tip for your welder to match the wire). This is what the Mig welder uses (it is spool fed) to make the welds.
- -A compact bender . I got this one from Grizzly but Harbor freight has them as well.
- -A angle grinder with 80 grit flap wheel disc, cutoff disc, and grinding disc. People will tell you can use grinding wheels but they are very slow at grinding welds and suck IMO. The Flap discs you will need to change more often but its worth the added expense for me.
- -A Metal chop saw. I like this Dewalt. Granted you don't need a chop saw but it will life a lot easier. You can just use a angle grinder with a cutoff blade, but if you plan on doing a lot of welding get a metal chop saw. Eventually you may want to upgrade the abrasive blade to one of these if you plan on doing more precise cuts. Abrasive blades tend to have a bit of "flex" to them and makes everything a pain in the ass if you're trying to make mitre cuts on stuff like 1″steel tube. If you use a angle grinder with a cutoff wheel make sure to use the thinnest one you can find.
- -A set of these or similar for drilling steel. You will also need drill oil
- Consider this a barebones list of what you need to make these hairpins. There are a ton of other thing you can and should buy including a welding table, face shield (for the chop saw), center punch, aviation snips, plate shear..The list goes on. Welding isn't for everyone but you will need everything on the list above (minus the chop saw) to build the hairpin legs.
- Material wise you will need the following:
- -3/8″ Cold rolled steel rods, 8′ lengths.
- -1 1/2″ Cold rolled flat bar, 16 gauge. 8’ lengths.
- You can use hot rolled steel (as did I) in my first few welding projects but cold rolled is superior in my experience. It is slightly more expensive but totally worth it and has a way better finish to it and is more appropriate for the stuff i make. Home Depot carries hot rolled steel, but you are better off finding a local supplier that specializes in steel. Again, as noted in the safety link above, DO NOT WELD WITH GALVANIZED STEEL!!!
Instructions:
Step 1-
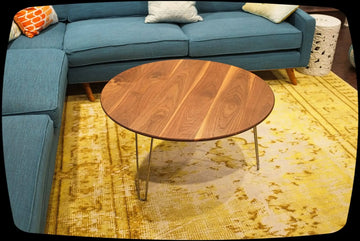
With the angle grinder, cut the 3/8″ rod into 32″ lengths with the cutoff blade on the angle grinder or with a chop saw. Were going to be making 16″ (coffee table height) legs. A sharpie works best for marking the steel.

Step 2:
Take the 32″ length rods and line them up (i needed to make 6 legs for this tutorial), marking them at 16″. We will be bending them in half, if you need a different length cut them shorter or longer, then mark halfway along the length.

Step 3-
Stick them in the bender as pictured, with the halfway length mark meeting the end of the center bend pivot. Look closely to see the sharpie mark.

Step 4-
Bend! You now have something that kind of resembles a hairpin leg! Hallelujah!

Step 5:
You're halfway there.

Step 6:
Mark and Trim back the bent rods so they are all exactly the same length. Here I'm using a square on my festool MFT. My intended tabletop is 1″ thick so I'm marking the hairpins at 15″ (15″ +1″ tabletop= 16″ height) then cutting them all again on the chop saw. I haven't quite figured out how to get exactly each side to be the same length after bending so if you have tips here, let me know!
The most important thing to note here is ACCURACY. If you are off in marking your cut lines by even a 16th of a an your table will wobble when you attach the legs! You have been warned.

Step 7:
Grind down the burrs on rods where you cut them off with either a grinding wheel or abrasive flap disc on an angle grinder. I used a 40 grit abrasive flap wheel
Step 8:
Cut the 1 1/2″ 16 gauge steel bar into 3.5″ and 5″ lengths. Im using a plate shear but you can use angle grinder with a cutoff disc, but make sure to cut your lines precisely.

Step 9:
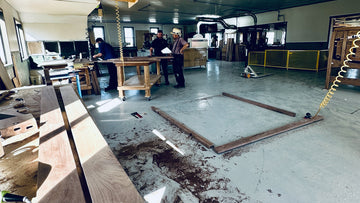
Time to weld…Butt the 3.5″ and the 5″ bar as pictured, beveling the joint (with an angle grinder) where the two pieces meet so the weld puddle has somewhere to go. Check for square! Tack welds, then weld the remainder of the joint. Turn on the welder and open the valve on your c25. Do not attempt to weld on top of plywood, Mdf or anything flammable (did that- facepalm!) and then attempt just clamp to your workpiece with the ground clamp. Either get a plate of metal and fasten it to your tabletop or buy a proper welding table.

Step 10-
Grind down your welds on your butt joint and you should have something that looks like this. At this point it is best to sort out where you are putting your mounting holes before attaching the legs. Use a center punch to mark your holes and drill.

Step 11:
Grab the hairpins and place them on top of the piece you just welded together. I built this small wooden jig that angles back at 15 degrees in a classic midcentury style. You can make a jig like this out of steel (probably a good idea since wood is flammable!...lazy) at any angle you want. 10-15 degrees works for most of the furniture i make. Make a few tack welds, then weld the rod onto the plate. Make sure your ground clamp is clamped on your welding table and you're not standing in water or with wet shoes, and you're ok to handle the hairpins while you weld. I use one hand to hold them and the other with the welding electrode while in doing this part. No ground clamp and you won't get the electrode to fire anyways and will just shoot out a bunch of wire.

Step 12:
You made your own hairpins! Thank baby jesus. Rub down with furniture wax to prevent rust!